Alright so here are the supplies that I purchased all for $31.00.
5-1x3 8 ft long
1-1x8 8 ft long
2- 2x4 8 ft long
screws
gel stain – walnut
I already had on hand the wood putty and sandpaper. Not a bad price for a simple easy build.
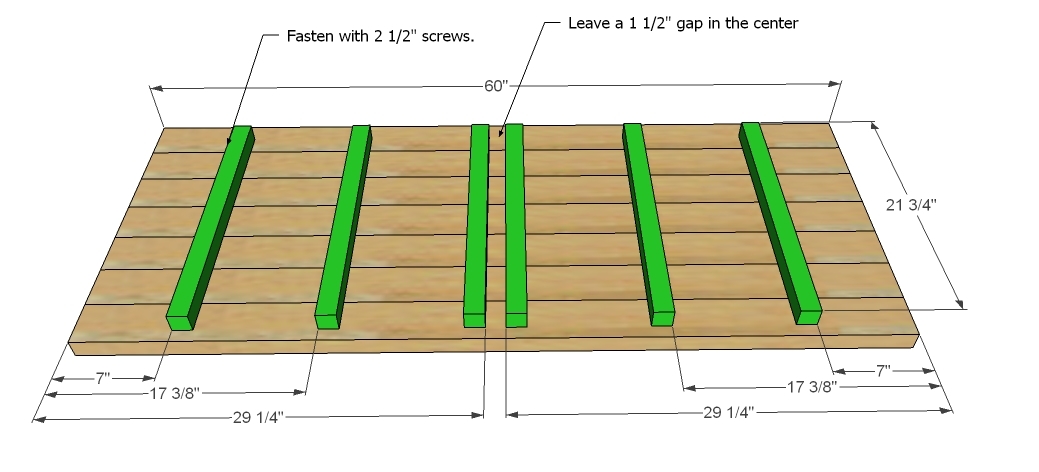
I started with my 5 1x3 boards which were 8 ft long. In order to get the most out of my wood and have an island that was still a good size for my kitchen I chose to cut the boards into 32 inches. When finished cutting you should have 15 boards that are each 32 inches long.
I used 7 of the boards for the top of my island. Look at the boards and figure out which ones you want for the top and try to get them to where they fit together as close as possible. This will prevent you from having large gaps between your boards. Once you know which ones you want and have them lined up flip them over so that the bottom of the boards are facing you. I used Gorilla Glue and glued all my boards together. Just use a thin strip down each board and push them together. Then take one of your 32 inch 1x3 and cut it down to where it will lay across all the boards but yet not reach all the way to the ends. See above photo on the right.


I suggest that you predrill your screw holes so that you will prevent the wood from splitting. It also makes your screws easy to put into place. Predrill your holes and make sure you don’t go all the way through the top island board and then insert screws. It is best to use a screw in each board. You can see in the above photo on the right that there is not a screw to hold one board in place but it is best to make sure that you do use a screw for each board. When you go to screw your boards in try and hold them together as close as possible. This will insure that your island top boards are as close together as possible.


Flip it over and you have just completed the top of your island. You can see in the photo on the left that I didn’t get all my boards exactly straight and that is okay. I just used the circular saw to take off the small parts that were to long and then sanded them to make sure they were smooth. Go ahead and set aside the top island piece to where the bottom is face up and grab your 1x8 board.
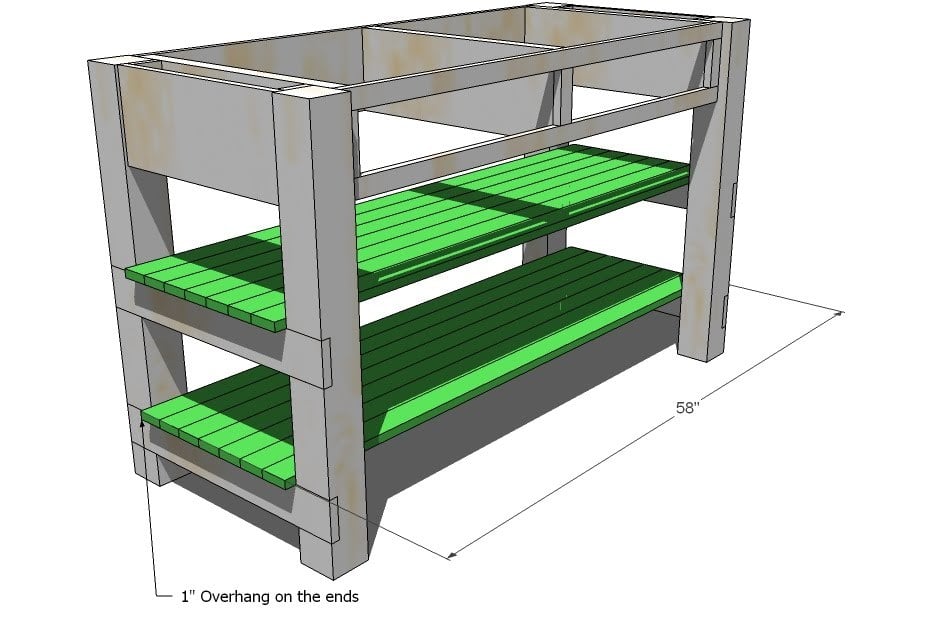
The 1x8 board is going to be used to make the sides of the island. I cut two boards at 31 inches long and as you can see in the photo on the right these two boards will be for the long sides of the island. Set those two boards aside and move onto cutting the boards for the shorter sides which mine were not quite 15 inches long. You will also need 2 2x4 boards cut to the length that you want the height of your island to be. Mine were cut at 36 inches long.
Now the assembling of the island starts. I did this by myself so it is possible to get all these boards together but if you have someone to help then that is all the better!
The above pictures show where the placement of the 2x4 boards go. Of course it is 2 on end and 2 on the other end. Make sure your 2x4 boards are exactly the same length because even if they are off by a little you will have an island that wobbles and you don’t want that. Then as in the photo on the right you can see how the side boards will be placed. I balanced all of this on a couple of sawhorses but any level area should work.
Predrill your holes and insert screws to hold the leg onto the longest side board. They don’t have to line up exactly and I sank mine into the boards a little bit so that I could later cover the hole area with some wood putty. You don’t have to do that step if you are okay with your screw heads showing.
Then you will need to attach the short sides of the island to the long sides. So again predrill holes and then insert screws so that it is all held together. My island fit fairly tight and I just flipped it over and didn’t worry about inserting another board to screw the island top down. If you want to see how that is done please view how
Our Vintage Home done hers.


Flip it over and at this point if you don’t want a bottom shelf you can quit with the building process. Go ahead and fill all the holes with wood filler if you want, then sand and paint. I wanted a shelf so I took another one of the 32 inch 1x3 boards and cut it to where it would fit across the bottom of my island. Do this for both sides and measure up from the bottom to make sure that they are the same size. I was lazy and just stacked two of 1x3 boards against the legs and then laid my board that would hold my shelf on top of them. Screw it in and then remove the two 1x3 boards out. Do the other side and you will know that they are the same! Easy enough!

Take those leftover 1x3 boards and cut them down to where they will fit on the boards that support the shelf. I simply used Gorilla Glue to hold mine together. You could do the boards like we did for the island top but I didn’t find that I had to. If you look you can see my support board showing and I didn’t want that so I will show you how I fixed that. First of all scoot your shelf boards all the way to where they are touching the edge of the support board.


Once I had my boards scooted all the way to the edge of the support board I took another 1x3 board and laid it to where it was going to cover the edges of the exsposed boards as shown in the picture on the right. Attach the board with screws or Gorilla Glue. Ta-Da! Your all finished with the building process! Make sure you sand really well and get all areas smooth and then you can either stain or paint your island. Super easy and where you can find a solid wood island for around $30.00? Probably no where! If you have any questions please email me and I will do my best to answer them.


