Easy to build, Kitchen Island
I love Pinterest for several reasons and recently I was happily browsing when I came across this beautiful blog called Our Vintage Home. She posted on building her kitchen island and I just loved it! My kitchen space is rather small but having an island to use is something that I would love to have and I loved that I could build this to the size that I needed. So, head on over and check out the way that she built hers and I am going to show you what I used to do mine. All I had with me in the garage was my cellphone so you will have to excuse the quality of the photos. Now if your like me and you find something you love on a blog you head straight for the bottom of the page to see what it looks like. Right? Well I will just start with my finished island and then you don’t have to do that. :)
Alright so here are the supplies that I purchased all for $31.00.
5-1x3 8 ft long
1-1x8 8 ft long
2- 2x4 8 ft long
screws
gel stain – walnut
1-1x8 8 ft long
2- 2x4 8 ft long
screws
gel stain – walnut
I already had on hand the wood putty and sandpaper. Not a bad price for a simple easy build.
I started with my 5 1x3 boards which were 8 ft long. In order to get the most out of my wood and have an island that was still a good size for my kitchen I chose to cut the boards into 32 inches. When finished cutting you should have 15 boards that are each 32 inches long.
I used 7 of the boards for the top of my island. Look at the boards and figure out which ones you want for the top and try to get them to where they fit together as close as possible. This will prevent you from having large gaps between your boards. Once you know which ones you want and have them lined up flip them over so that the bottom of the boards are facing you. I used Gorilla Glue and glued all my boards together. Just use a thin strip down each board and push them together. Then take one of your 32 inch 1x3 and cut it down to where it will lay across all the boards but yet not reach all the way to the ends. See above photo on the right.
I suggest that you predrill your screw holes so that you will prevent the wood from splitting. It also makes your screws easy to put into place. Predrill your holes and make sure you don’t go all the way through the top island board and then insert screws. It is best to use a screw in each board. You can see in the above photo on the right that there is not a screw to hold one board in place but it is best to make sure that you do use a screw for each board. When you go to screw your boards in try and hold them together as close as possible. This will insure that your island top boards are as close together as possible.
Flip it over and you have just completed the top of your island. You can see in the photo on the left that I didn’t get all my boards exactly straight and that is okay. I just used the circular saw to take off the small parts that were to long and then sanded them to make sure they were smooth. Go ahead and set aside the top island piece to where the bottom is face up and grab your 1x8 board.
The 1x8 board is going to be used to make the sides of the island. I cut two boards at 31 inches long and as you can see in the photo on the right these two boards will be for the long sides of the island. Set those two boards aside and move onto cutting the boards for the shorter sides which mine were not quite 15 inches long. You will also need 2 2x4 boards cut to the length that you want the height of your island to be. Mine were cut at 36 inches long.
Now the assembling of the island starts. I did this by myself so it is possible to get all these boards together but if you have someone to help then that is all the better!
The above pictures show where the placement of the 2x4 boards go. Of course it is 2 on end and 2 on the other end. Make sure your 2x4 boards are exactly the same length because even if they are off by a little you will have an island that wobbles and you don’t want that. Then as in the photo on the right you can see how the side boards will be placed. I balanced all of this on a couple of sawhorses but any level area should work.
Predrill your holes and insert screws to hold the leg onto the longest side board. They don’t have to line up exactly and I sank mine into the boards a little bit so that I could later cover the hole area with some wood putty. You don’t have to do that step if you are okay with your screw heads showing.
Then you will need to attach the short sides of the island to the long sides. So again predrill holes and then insert screws so that it is all held together. My island fit fairly tight and I just flipped it over and didn’t worry about inserting another board to screw the island top down. If you want to see how that is done please view how Our Vintage Home done hers.
Flip it over and at this point if you don’t want a bottom shelf you can quit with the building process. Go ahead and fill all the holes with wood filler if you want, then sand and paint. I wanted a shelf so I took another one of the 32 inch 1x3 boards and cut it to where it would fit across the bottom of my island. Do this for both sides and measure up from the bottom to make sure that they are the same size. I was lazy and just stacked two of 1x3 boards against the legs and then laid my board that would hold my shelf on top of them. Screw it in and then remove the two 1x3 boards out. Do the other side and you will know that they are the same! Easy enough!
Take those leftover 1x3 boards and cut them down to where they will fit on the boards that support the shelf. I simply used Gorilla Glue to hold mine together. You could do the boards like we did for the island top but I didn’t find that I had to. If you look you can see my support board showing and I didn’t want that so I will show you how I fixed that. First of all scoot your shelf boards all the way to where they are touching the edge of the support board.
Once I had my boards scooted all the way to the edge of the support board I took another 1x3 board and laid it to where it was going to cover the edges of the exsposed boards as shown in the picture on the right. Attach the board with screws or Gorilla Glue. Ta-Da! Your all finished with the building process! Make sure you sand really well and get all areas smooth and then you can either stain or paint your island. Super easy and where you can find a solid wood island for around $30.00? Probably no where! If you have any questions please email me and I will do my best to answer them.
Build Michaela's Kitchen Island
Michaela's Kitchen Island is the perfect blend of functionality and rustic beauty. Featuring added shelves, two large drawers, and a wood top, this solid wood kitchen island was built by Michaela at The Garden's Eden.
Shopping List:
1 – 10′ 4×4 Post, Should be cheap, Untreated (you can also modify by using 2 2x4s laminated, remember the dimensions will be 3″ x 3 1/2″ as opposed to the dimensions of a standard 4×4 of 3 1/2″ x 3 1/2″ so you will need to make modifications)
14 – 1×3 Boards (About $1.50 Each)
7 – 2×4 boards, stud length or 8′ Length
1 – 1×8 board, 8′ Long (About $8.00 Each)
1 – 2×8 Board, 8′ Long (About $7.00 Each)
2 – 1×2 Boards, 8‘ Long (About $1.00 Each)
3 – 1×4 Boards, 8′ Long (About $4.00 Each)
1 – 1×6 Board, 4′ Long (About $3.00)
1/4 Sheet 1/2″ Plywood
21″ Drawer Slides
Handles or Knobs for 2 Drawers
1 1/4 inch screws
2 inch screws
2 1/2 inch screws
2 inch finish nails
1 1/4 inch pocket hole screws
2 1/2 inch pocket hole screws
wood glue
wood filler
120 grit sandpaper
primer
wood conditioner
paint
paint brush
Tools:
measuring tape
square
pencil
hammer
safety glasses
hearing protection
drill
circular saw
sander
level
General Instructions:
Work on a clean level surface. Use proper safety equipment and precautions. Always take a square after each step. Use straight and dimensionally sized lumber. Predrill and countersink your screw holes. Use glue unless otherwise directed.
Dimensions:
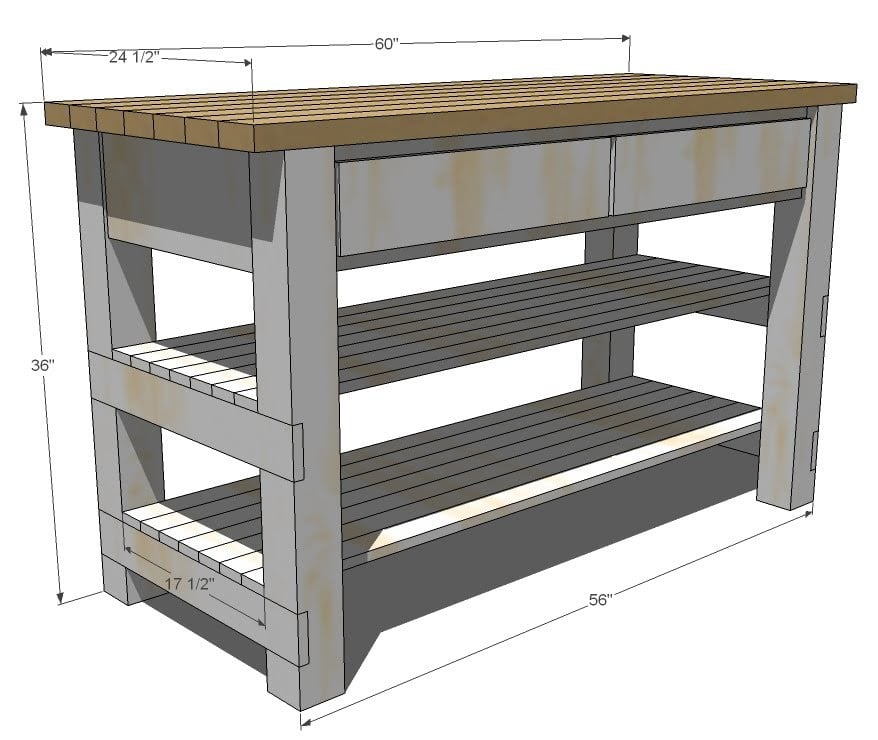
Overall Dimensions and Composition are shown above
Cut List:
Cutting List
4 – 4×4 Posts @ 34 1/2″ (Notched out for shelf stretchers)
4 – 1×3 @ 7 1/2″ (Spacers)
2 – 1×8 @ 17 1/2″ (Side Aprons)
1 – 1×8 @ 49″ (Back Apron)
3 – 2×8 @ 21 3/4″ (Sides of Drawer Housing)
2 – 1×2 @ 49″ (Face Frame Top and Bottom)
3 – 1×2 @ 4 1/2″ (Measure to fit exactly, space trim on face frame)
4 – 1×4 @ 24 1/2″ (Shelf Supports)
14 – 1×3 @ 58″ (Shelf Tops)
6 – 2×2 @ 21 3/4″ (Top Supports)
7 – 2×4 @ 60″ (Countertop)
Cut List for Drawers
2 – 1/2″ Plywood @ 21″ x 21 1/4″ (Drawer Bottoms)
4 – 1×4 @ 21″ (Drawer Sides)
4 – 1×4 @ 19 3/4″ (Drawer Fronts and Backs)
2 – 1×6 @ 23 3/4″ (Drawer Faces)
4 – 1×4 @ 21″ (Drawer Sides)
4 – 1×4 @ 19 3/4″ (Drawer Fronts and Backs)
2 – 1×6 @ 23 3/4″ (Drawer Faces)
Cutting Instructions:
It is always a good idea to measure your finished drawer opening before constructing drawers. Most side mount drawer slides need 1/2″ clearance on each side for a total of 1″ clearance.
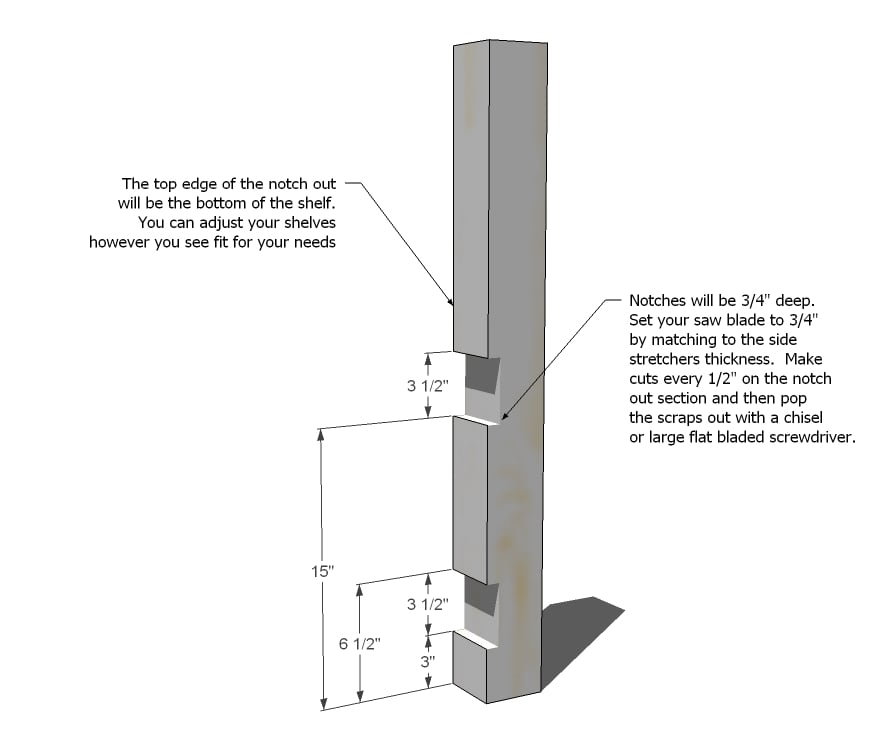
Step 1:
1. Legs. Notch out your legs as shown above. You can modify the notches to the needs of your kitchen. For example, if you have baskets or bins that are taller, you may wish to have only one shelf. There is a video here of me notching out legs on my table.
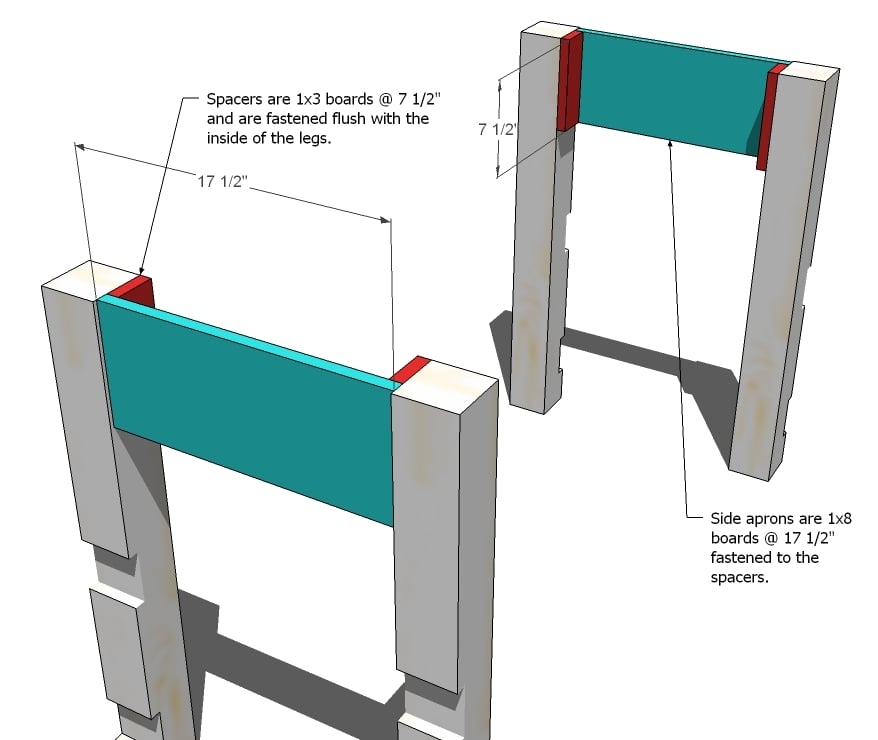
Step 2 Instructions:
2. Spacers. Begin by attaching a spacer to each of the insides tops of the legs, as shown above. Notice how the spacers will be in different positions depending on the leg. The easiest fastening method is to use your 2″ finish nails, but if you do not have a nailer, you can use 2″ screws and glue. Keep the top inside corner flush.
Side Apron. Also shown in the above diagram is the side apron (in blue). Use glue and 2″ nails to fasten the side apron to the spacers.Keep top edges flush. Check for square.
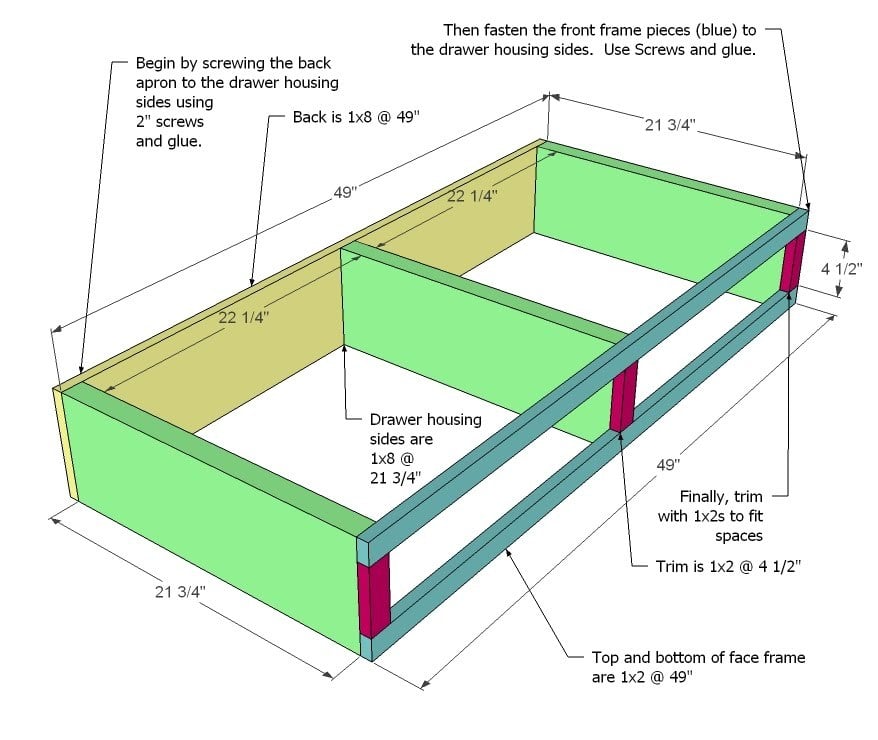
Step 3 Instructions:
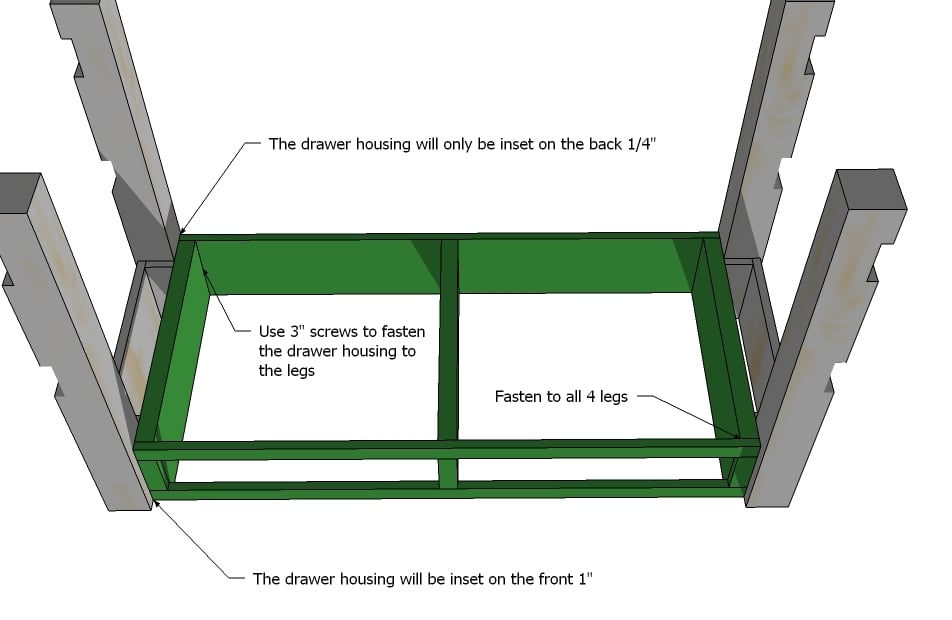
Drawer Housing. As shown above, build the drawer housing. Start by fastening the back apron to the drawer housing sides. Use the measurements above to guide you. Then attach the face frame pieces. Finally, measure and fill in the spaces between the face frame with 1x2s. You must build this housing perfectly square or your risk your drawers not sliding properly.
Step 4 Instructions:
Fastening the Drawer Housing to the Legs. Turn everything upside down on a clean level surface. Attach the drawer housing to the legs 1″ inset from the front and 1/4″ inset on the back. Use glue and 3″ screws. Check for square. Get some help flipping it all over after the glue dries.

Step 5 Instructions:
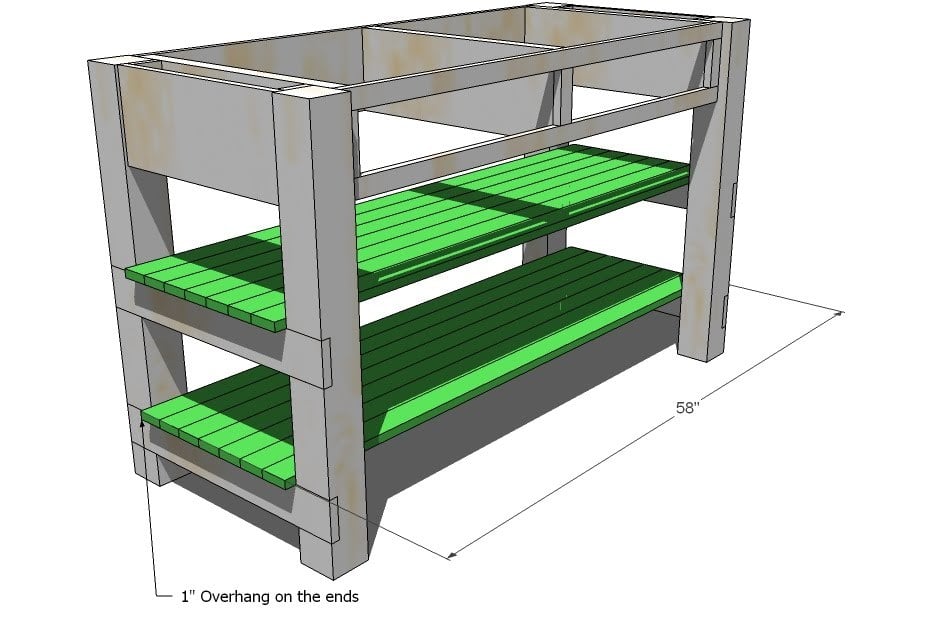
Shelf Supports. Fasten the shelf supports to the legs as shown above. Use glue and 2″ screws.
Step 6 Instructions:
Shelf Tops. Fasten with 2″ screws the shelf tops to the shelf supports. Check for square. There will be a 1″ overhang on the ends. Please note that you can use other types of boards for the shelf.
Step 7 Instructions:
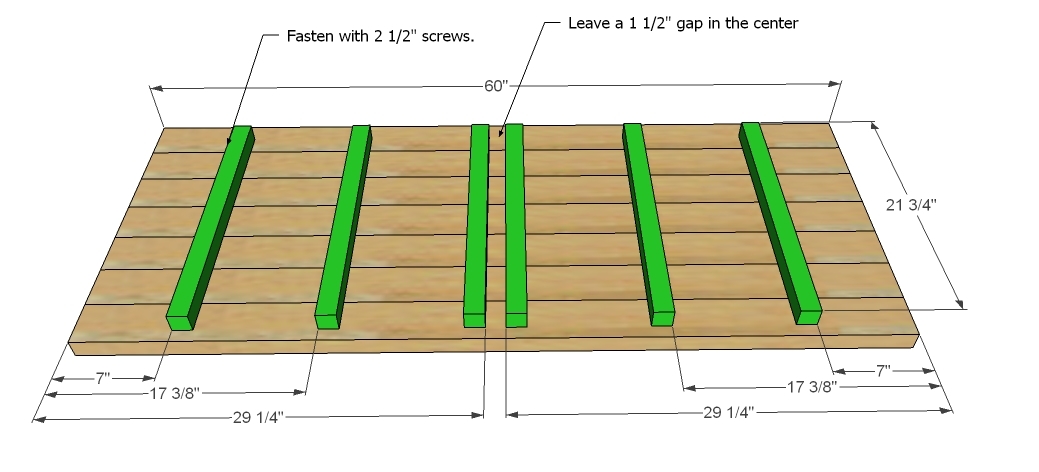
Top. One a clean level surface, lay out the tabletop boards. Then position the supports on top as shown above. Take great care to be exactly square, fasten the spacers to the tabletop pieces. Minimize the gaps between the tabletop pieces as you go. Leave a 1 1/2″ gap on the center, wide enough to accommodate the 2×8 drawer housing sides.

Step 8 Instructions:
Attaching the top. To keep the top free of screw holes, lay the top on top of the island. The drawer housing sides should sit flush with your supports. Fasten through the supports into the drawer housing sides. Also fasten through the tops of the face frame into the supports. You will not see these screw holes because the drawer face will cover it. If you do not use glue, this gives you freedom to remove the top and replace or refinish if desired.
Step 9 Instructions:
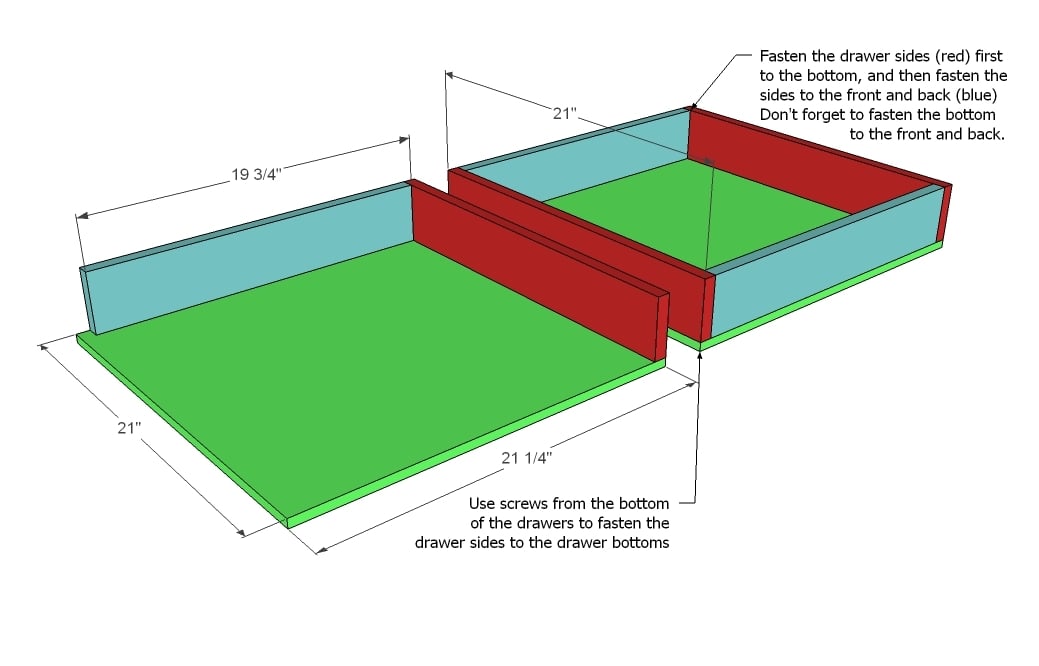
Drawers. Begin building the drawers by cutting the bottoms of the drawers out of the 1/2″ plywood. You must cut your drawer bottoms very square or they will not fit properly in your drawer housing. Then fasten the red boards, sides to the bottoms using 2″ screws and glue. Then fasten the fronts and backs to the sides and bottoms. NOTE: Check your drawer slides before constructing the drawers. Different drawer slides need different clearances, and you may need to adjust your drawer size for the slides.
You can also use any scrap 1x3s to create drawer partitions at this stage. Drawer partitions will strengthen your drawer and save you tons.

Step 10 Instructions:
Inserting the Drawers. Using the drawer slides, fit the drawers without the faces into the drawer housing. When completely inserted in the drawer housing, the fronts of the drawers will be flush with the face frame.

Step 11:
Drawer Faces. So you want your drawers to be perfectly lined up. Here’s my trick. With the drawers inserted into the housings all the way, position your faces on the drawer fronts. Leave a 1″ gap on the tops and bottoms of the faces, and a 1/2″ gap between the drawers. Then with your nailer and 1 1/4″ nails, fasten the faces to the drawers. You only need just a couple of nails. Avoid where your hardware will be placed. Then carefully open the drawer and from the inside of the drawer, use your 1 1/4″ screws to secure the face to the drawer front.


